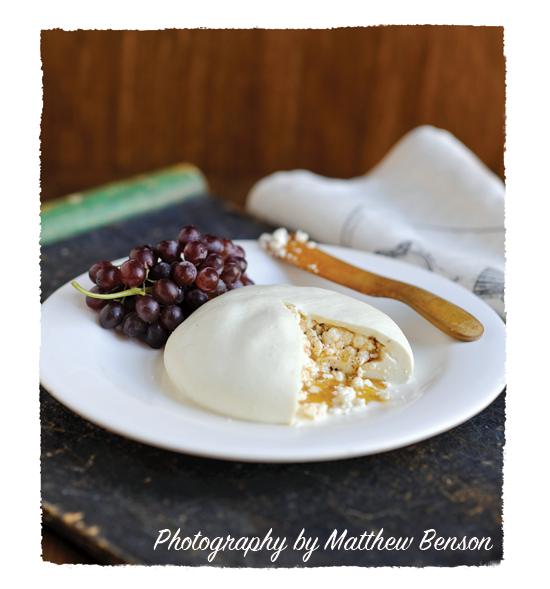
Make this Brown Butter Burrata from One-Hour Cheese and make any cocktail party a success!
Homemade Brown Butter Burrata
Makes 1 ½ pounds
INGREDIENTS
- 4 tablespoons salted butter
- 1 ½ teaspoons citric acid
- ½ cup plus ¼ cup dechlorinated water
- ¼ tablet vegetarian rennet
- 1 gallon whole cow’s milk (not ultra-pasteurized)
- 1 cup cream
- 1 ¼ teaspoons flake salt, divided into two ½ teaspoons and one ¼ teaspoon
INSTRUCTIONS
Part 1: Browning the Butter
- Melt the 4 tablespoons of butter in a saucepan set over medium heat.
- Let it simmer and brown (don’t walk away) for 4 to 6 minutes. Stir every minute or so to make sure the butter isn’t burning. The color should turn dark amber, like weak coffee or strong tea.
- Transfer the butter to a small heat-proof bowl and set it aside in a warm place. (Beautiful, isn’t it?)
Part 2: Making the Cheese
- Stir the citric acid into the ½ cup of water and set it aside.
- Dissolve the ¼ tablet of rennet in the ¼ cup of water and set it aside.
- Pour the gallon of milk and the cup of cream into the pot.
- Stir in the dissolved citric acid solution. Then heat the milk on medium to 90° F.
- Add the rennet solution and mix it in with 20 quick strokes to make sure it is incorporated evenly.
- You will see some separation between curds and whey, or the milk could look like shiny yogurt or clumps of cheese, and/or you could see a large curd mass that pulls away from the sides of the pot when you press it with the back of a spoon.
- Without stirring, continue heating to 105° F (or 110° F if you will not be using a microwave for stretching the curd). You should see coagulation at 105° F but even if you don’t, lower the heat and keep the curds at 105° F (or 100° F) for the following step.
- Use the spoon to gently slice through any large clumps of curd so that the largest pieces are just 1 to 2 inches. Slowly move the pieces around in the pot for 1 to 2 minutes.
- Avoid vigorously stirring the curds because this will break them into tiny pieces. Instead, slowly move the pieces around the pot to help them shrink, release more whey, and prepare the curds for the next heating and kneading steps.
- You should see a change in the texture of the curds, from that of soft yogurt to that of scrambled eggs. If you do not, heat for an additional minute. Then turn off the heat and scoop the curds into the microwave-safe bowl.
- Scoop 1 cup of the curds and place them in a small bowl. These will be used for the filling. Squeeze out any extra whey over the pot.
- To prepare the filling, gently mix the brown butter and ¼ teaspoon of the salt into the cup of curds in the bowl, breaking up the largest pieces as you stir.
- The consistency of the filling is up to your personal taste, but traditionally it includes a balance of some curds, some liquid, and a not necessarily completely smooth texture. Set the filling aide in a warm place.
- Divide the large bowl of curds (not buttered) into two equal proportions.
- Move one half (roughly 1 cup) into a medium bowl and set it aside.
- Heat the remaining portion of curds in the microwave for 25 second. Use the spoon or your hands to fold the curds over 4 to 5 times to evenly distribute the heat and to begin to gather the curds into a large mound.
- Use the spoon to hold back the curds while you pour any released whey into the pot.
- Microwave the drained curds again for 25 seconds, and ½ teaspoon of the salt, fold the curds 15 times (or less, just until they hold together), and drain any excess whey.
- You should start feeling a change in the texture of the curds: They may hold together better, feel more springy and stretchy, and may appear a little shinier.
- Microwave again for 15 seconds. Fold the curds 5 times to distribute the heat and then knead the curds until you see a slight shine (the curd is quite hot now, so use a spoon or wear gloves if necessary).
- The texture now resists in a clearly spring manner, and the curd easily forms a ball (it could take up to another 20 folds).
- Working quickly to retain heat, gather the ball of curd and flatten it into a circle on a sheet of parchment paper, leaving the middle slightly thicker than the edges. (If you need a little more heat to flatten the ball, microwave the curds for another 10 seconds.)
- Scoop half of the reserved buttery curd filling from step 13 and pile it in the middle of the flattened circle of curd.
- Bring four opposite edges of the flat circle to meet one another, keeping the creamy curds inside, and pinch the edges together to make a small pouch.
- Press the edges together to keep the pouch closed; the remaining heat will seal them, as will the next step. You may serve the cheese as a rustic pouch, or…
- …wrap the paper around the pouch and twist the top tightly so that the cheese continues to melt, trapping the curds inside as it settles for just 5 to 10 minutes at room temperature.
- Unwrap the cheese to eat it at room temperature. The butter is oozy and the curd melts in your mouth. (Visually, it may flatten a little, but it’s delicious and consistent with the traditionally loose look of these pouches).
- Repeat steps 14 to 27 with the second half o the curd. To serve, cut into the pouch to appreciate both layers of texture and flavor. Dip crispy slices of pear or apple right into the filling.
 One-Hour Cheese
by Claudia Lucero
It’s a DIY cook’s dream come true: It’s pizza night, and you’ve made not only the crust and sauce but the mozzarella, too. Or the dinner party’s in high gear and out comes the cheese plate—and yes, you’ve made all the cheeses on it. Even better—you made them all earlier that day.
In a cookbook whose results seem like magic but whose recipes and instructions are specific, easy-to-follow, and foolproof, Claudia Lucero shows step by step—with every step photographed—exactly how to make sixteen fresh cheeses at home, using easily available ingredients and tools, in an hour or less. The approach is basic and based on thousands of years of cheesemaking wisdom: Heat milk, add coagulant, drain, salt, and press. Simple variations produce delicious results across three categories—Creamy and Spreadable, Firm and Chewy, and Melty and Gooey. And just as delicious, the author shows the best ways to serve them.
GET THE BOOK: Amazon | B&N | ebooks.com | Google Play | iBooks | Kobo