Copyright © 2015 Todd Coleman
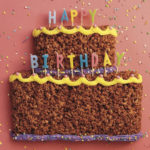
This layer cake relies on cocoa powder, not melted chocolate, for its good chocolaty flavor, which saves you washing a pan. The cake is light but immensely satisfying, and when it’s topped by the chocolate buttercream frosting (see below), you have a Norman Rockwell chocolate cake, one that begs for candles and a small round-cheeked child to blow them out. You can also choose to go with vanilla buttercream (see below), plain or tinted.
Birthday Chocolate Cake
Makes one 2-layer cake; serves 10 to 12
INGREDIENTS
- 1 cup (2 sticks) unsalted butter, at room temperature, plus butter for greasing the baking pans
- 2 cups cake flour (not self-rising), plus one more for flouring the baking pans
- ⅔ cup unsweetened Dutch-processed cocoa powder
- 2 teaspoons baking powder
- ½ teaspoon kosher or coarse salt
- 2 cups granulated sugar
- 3 large eggs, at room temperature
- 2 teaspoons pure vanilla extract
- ½ cup sour cream, or another ½ cup whole milk
- ¾ cup whole milk
INSTRUCTIONS
-
- Place a rack in the center of the oven and preheat the oven to 350°F. Place two pieces of waxed paper or parchment paper on top of each other. Set a deep (2-inch) 9-inch cake pan on top and trace the bottom of the pan on the paper. Cut out two circles following the trace marks. Butter two deep 9-inch round cake pans, then place a paper circle inside each of the two pans. Butter the paper circles and add a bit of flour to each pan, knocking it around so it coats the bottom and side. Turn the pans upside down to tap out the excess flour. (Don’t let the paper circles drop out.) You can also use Baker’s Joy or another baking spray instead of
the butter and flour. - Combine the cake flour, cocoa powder, baking powder, and salt in a medium-size bowl.
- Place the butter and sugar in a large mixing bowl and, using an electric mixer, beat them until light and fluffy, about 3 minutes. Scrape down the side of the bowl and add the eggs one at a time, beating well after each addition. Beat in the vanilla, blending until the mixture is smooth and glossy, about 2 minutes longer. Scrape down the side of the bowl again. Blend in the sour cream, if using, or the additional ½ cup milk. Add half of the flour mixture and
mix at low speed until just almost blended. Add half of the ¾ cup of milk, beating until almost incorporated, then add the remaining flour mixture, blending until almost
combined, followed by the remaining milk. Stop while you can still see streaks of flour and milk in the batter, scrape down the side of the bowl, and give a few final stirs with a wooden spoon or a rubber spatula, mixing until everything is just blended. - Divide the batter evenly between the two prepared cake pans, smoothing the tops so they are level. Place the cake pans in the oven side by side. Bake the cake layers until a toothpick or wooden skewer inserted near the center of the layers comes out clean, 32 to 36 minutes.
- Let the cake layers cool in their pans on wire racks for 10 minutes, then invert them onto the racks, removing the pans and the paper circles. Gently turn the layers right side up and let them cool completely.
- When the cake layers are completely cool, use a thin spatula or butter knife to spread a very thin layer of frosting over the top and side of each layer. Then let the layers sit until the frosting starts to dry and harden a bit, about 15 minutes. Don’t worry if some crumbs are visible in this layer; you will be covering it with a nice thick layer of frosting. (If it’s hot out, or you want to speed up the process, put the layers, unstacked and uncovered, in the
fridge for about 10 minutes.) The base layer of frosting seals in the crumbs and then allows you to spread on a thicker layer of frosting without having to worry too much about the crumbs from the layers surfacing as you frost the cake. - Spread a thick layer of frosting over the top of one of the cake layers. Place the other cake layer on top, then generously frost the side of the cake. Finally, frost the top of the cake. You can use the spatula or knife to smooth the side and top of the cake or swish and swirl so that nice little peaks and valleys of frosting are created, depending on what look you’re going for.
- Place a rack in the center of the oven and preheat the oven to 350°F. Place two pieces of waxed paper or parchment paper on top of each other. Set a deep (2-inch) 9-inch cake pan on top and trace the bottom of the pan on the paper. Cut out two circles following the trace marks. Butter two deep 9-inch round cake pans, then place a paper circle inside each of the two pans. Butter the paper circles and add a bit of flour to each pan, knocking it around so it coats the bottom and side. Turn the pans upside down to tap out the excess flour. (Don’t let the paper circles drop out.) You can also use Baker’s Joy or another baking spray instead of
Easiest White or Chocolate Buttercream Frosting
Makes enough to frost two 9-inch layers or 24 cupcakes
INGREDIENTS
- 5 cups confectioners’ sugar
- ⅓ cup unsweetened Dutch-processed cocoa powder, if you are making chocolate buttercream (see Note)
- Pinch of kosher salt or coarse salt
- 8 tablespoons (1 stick) unsalted butter, at room temperature
- 2 teaspoons pure vanilla extract (optional, but recommended)
- About 9 tablespoons milk (preferably whole), half-and-half, or heavy (whipping cream)
- Food coloring
INSTRUCTIONS
-
-
- Place the confectioners’ sugar, cocoa powder (if you’re making chocolate frosting), salt, and butter in a large mixing bowl and, using an electric mixer, beat them on the lowest speed, so the sugar doesn’t poof out all over the counter, until just combined.
- Add the vanilla and 5 tablespoons of the milk or cream (see Note). Keep blending until everything is smooth and creamy, about 3 minutes, increasing the mixer speed to medium, then to high once the liquid has been incorporated. Add more milk or cream 1 tablespoon at a time as needed to reach the desired consistency.
- If you are making the vanilla frosting and wish to tint it a color, use the food coloring. You can divide the frosting into several bowls and tint each a different color if that fits into your decorating plans.
-
Note: If you are using the cocoa powder to make chocolate frosting, you should start with 7 tablespoons of milk or cream and you can add more depending on what consistency you are looking for. Give the frosting a good stir right before you ice the cake.
 The Mom 100 Cookbook
by Katie Workman
The Mom 100 Cookbook is the lifesaving cookbook for every mother with kids at home—the book that solves the 20 most common cooking dilemmas. What’s your predicament: breakfast on a harried school morning? The Mom 100’s got it—Personalized Pizzas are not only fast but are nutritious, and hey, it doesn’t get any better than pizza for breakfast. Kids making noise about the same old lunch? The Mom 100’s got it—three different Turkey Wraps, plus a Wrap Blueprint delivers enough variety to last for years.
Katie Workman, founding editor in chief of Cookstr.com and mother of two school-age kids, offers recipes, tips, techniques, attitude, and wisdom for staying happy in the kitchen while proudly keeping it homemade—because homemade not only tastes best, but is also better (and most economical) for you.
GET THE BOOK: Amazon | B&N | IndieBound | Powell’s | Workman